ONELab User Interface
This section provides an overview of the ONELab operational UI in sequential order.
Logging in - Connect to the Linaro Hub
After you have purchased a subscription to ONELab, you’ve received you LAA, and your initial device setup is complete, the next step is connecting your LAA over the cloud to the ONELab cloud infrastructure. This is done by logging into the Linaro Solutions Hub.
After signing into the hub with a valid login, click Go to Dashboard for the subscription you wish to enter. This step is automated and upon subscription enablement, if you’ve already received your LAA, it will be present in your private Dashboard by clicking Platforms. Assuming you have yet to power on your LAA, it will show up as as “offline.” When the LAA is turned on, it will automatically connect, and within a few minutes, the LAA status will toggle to “online.”
Warning
Before powering up your LAA, it’s recommended that you follow the Quickstart section found in the LAA user’s guide to correctly configure your LAA.
Note
The ONELab Cloud Service will never initiate access into a corporate infrastructure. The LAA always initiates outbound connections to the ONELab Cloud Server from within any customer location. It will register availabilty to the cloud service and poll the service to check for CI tasks to perform.
If not logged in, the user can only see the public page of Linaro’s Solutions Hub. Log in is managed by subscription (or company).
Configure LAA
Assuming your platform is present in the subscription, you can enter the LAA (platform) configuration page first by clicking Platforms in the side menu and then clicking on the LAA platform you wish to configure. This will take you to a page that provides the detailed information about your platform. By clicking Configure Platform in the Actions dropdown menu, you can modify the configuration to include updated location, Customer Contact, desired Platform Name, and the Device Type you plan to install on the platform.
Warning
Please note that it’s possible to damage a DUT or an LAA if it’s configured for one Device Type and but install another! This is because various DUTs require different input voltage levels and input pin configurations. Always configure this page with the LAA off and the correct DUT (Device Type) on the LAA.
Private DashBoard
All subscriber activities are managed from the Private Dashboard. This allows the user to create Release Streams by uploading firmware builds, manage LAA Platforms, and kick off Compliance Runs. A sample Private Dashboard is shown below.
To access your Dashboard, start by navigating to the Linaro Solutions Hub. From there you will be able to login to the hub and access to the Private Dashboard associated with your subscription will be a click away.
See the video below for an example:
The following sections will provide more detail on the primary functions you can perform from the Private Dashboard.
Firmware Upload - Create Release Stream
To be able to to leverage ONELab, you need to have your firmware built to be compatible with ONELab. See the ONLab Firmware Packaging & Upload section of this document to package your firmware. ONELab accepts files in UEFI Capsules wrapped in a LVFS container.
Upload your .cab file by clicking on Firmware Release Streams in the side panel followed by clicking the Upload Firmware button. Browse to the .cab file you built and upload it.
Executing Tests
The primary purpose of ONELab is to support the execution of firmware interoperability tests, known as a Compliance Run, and to then display those results on the ONELab Public Explore Boards dashboard for customer clients to view. The three primary test types include OS installation, Application installation, and Arm’s SystemReady DT ACS tests.
From the ONELab Private DashBoard, you can choose to kick off one or multiple Compliance runs by selecting which firmware and which platform you would like to run the tests. You can monitor the status of the tests as they are queued, running, pass or fail.
The video below provides an example of running tests and monitoring results:
Warning
Be aware of the dependency that the SystemReady DT ACS tests have on the execution of the OS Installation tests. The OS tests must be run first in order to pass the ACS tests, as the ACS test has the requirement to validate the successfull install OS’s. Since ONELab supports execution of tests on first available LAA, there is the real possibility that an ACS test run may fail.
Workarounds: You can either choose to run all OS tests prior to running the ACS test for your platform, or run the ACS twice. Either will work.
Processing Test Results
Once tests have kicked off and completed, the user is now ready to evaluate results.
ONELab provides an internal dashboard that displays the latest results as shown in the following figure. You can then choose to process the results including downloading test logs, rerunning tests, or making the results public by sending them to the public dashboard. These options are all managed from the Compliance Run private page within the subscription, as shown below.
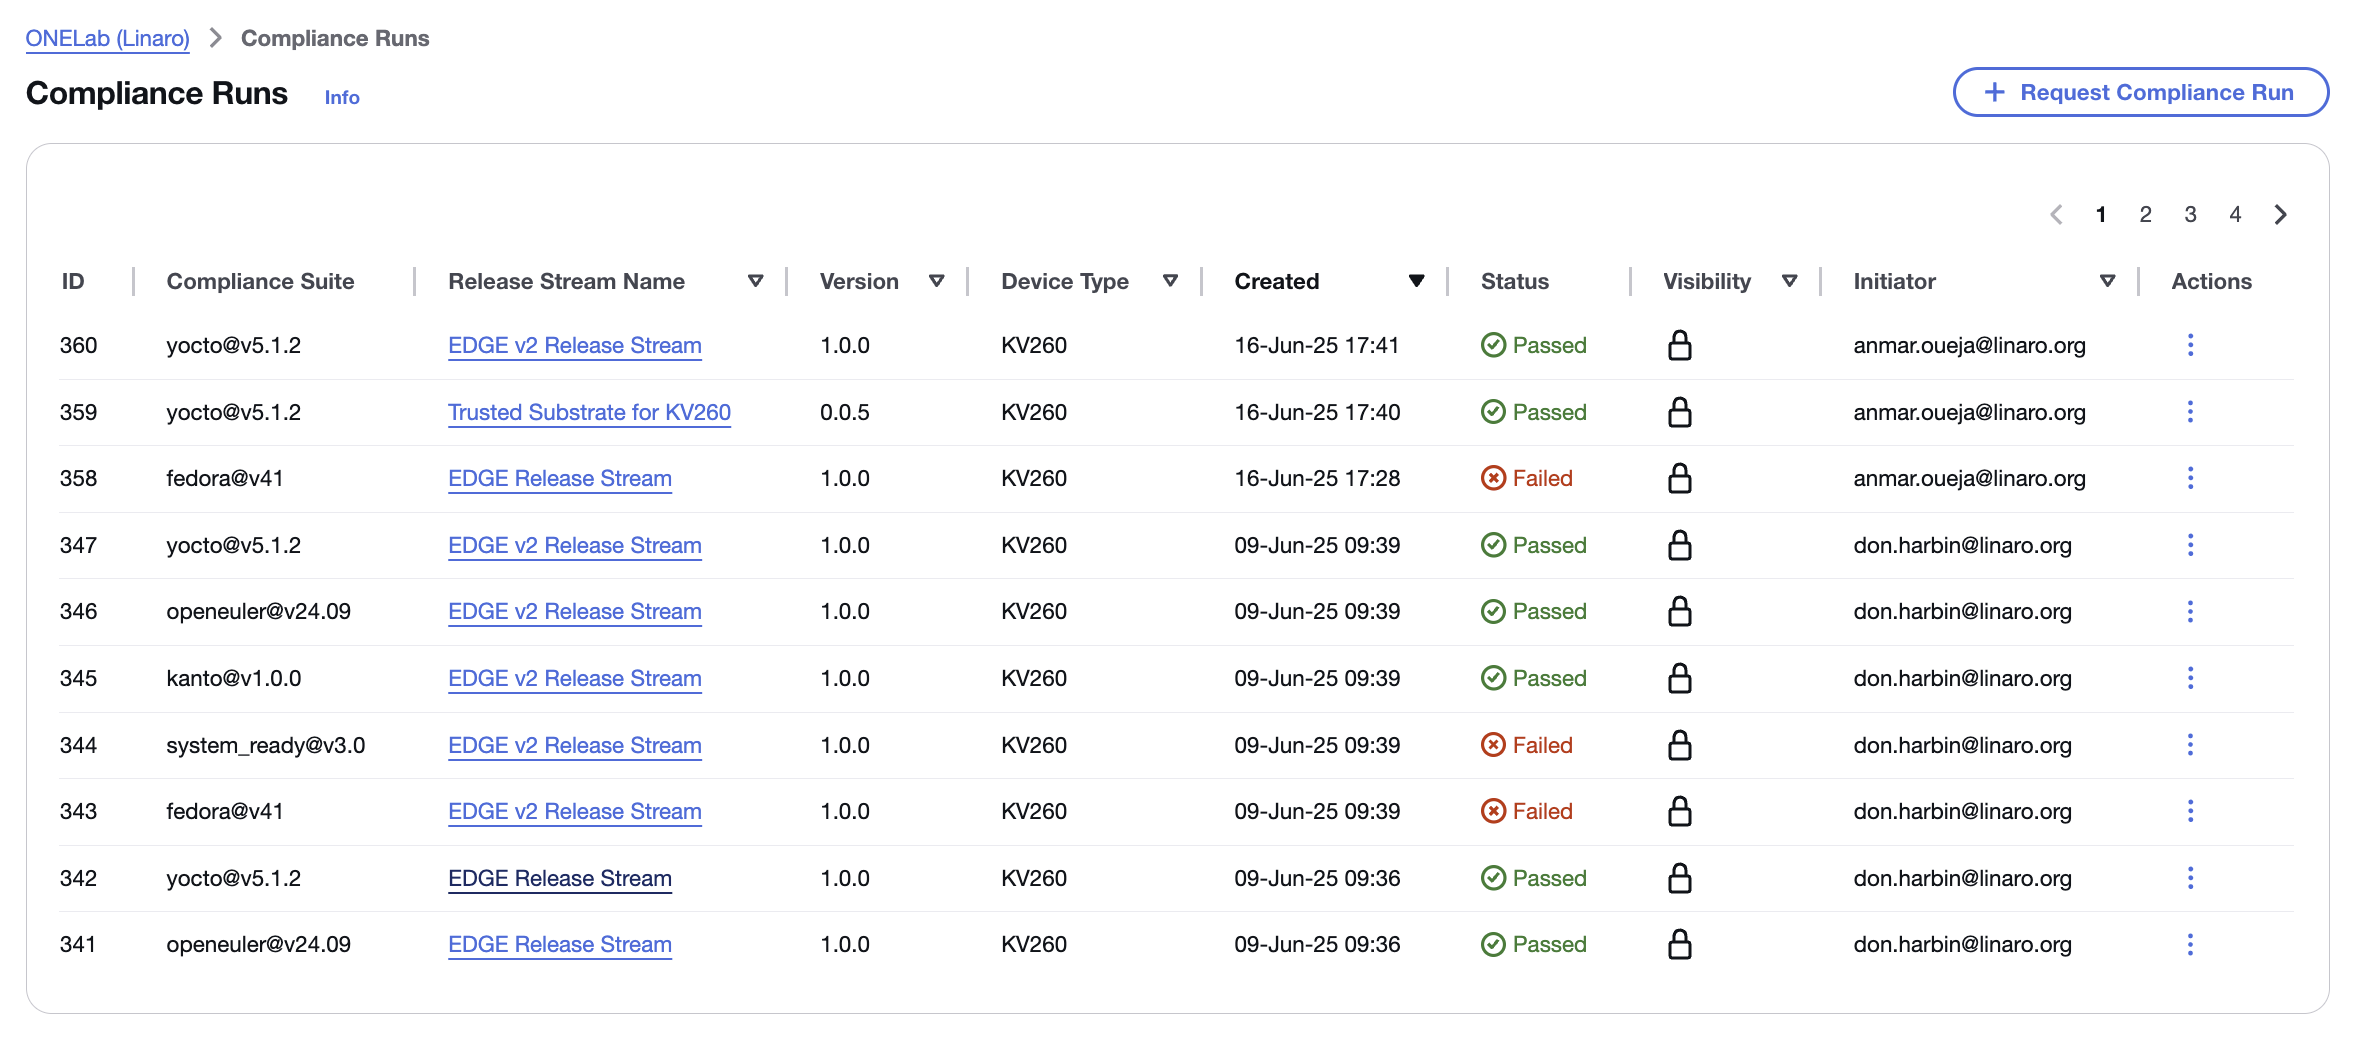
In the figure, there are several things to highlight:
Each row represents a specific interoperability test run for compliance.
Further actions such as rerunning a test, downloading logs, and promoting a Release Stream test suite to the public Explore Boards page can be selected from the Kebab menu selector (⋮) at the end of each row.
Note
When a compliance run is toggled to “Public,” this enables all tests for the associated Release Stream to public. Only tests that passed will be shown on the public Explore Board, failed tests will be shown as blank.
Transitioning an ACS test to “Public” is not enabled until the user has succefully “Self-Complied” on the ACS Processing page.
A private view of what will be shown on the Explore Boards Page can be seen on the Explore Boards Preview page.
The following section describes additional details in regards to SystemReady DT ACS results processing and compliance.
The video below provides a tutorial on processing general tests results in ONELab:
SystemReady ACS Results Processing
ONELab provides an interface for you to “self-comply” in regards to SystemReady. This is done through a specific ONELab interface page that allows you to analyze the detailed SystemReady DT ACS test results and process accordingly. This section will further explain this process.
High level notes regarding ONELab SystemReady DT Self-Compliance
If the SystemReady DT tests complete, then the option to further process the results and self-comply will be presented to you through the kebab action menu that will expose an “ACS Processing” option.
Note
If after completing the SystemReady DT tests the “ACS Processing” option is not available, this indecates that the tests did not complete. It will be up to the user to determine why the tests didn’t complete, but it’s often caused by an installation “hang” failure. The LAVA logs will help isolat this. Once you have a firmware that completes the SystemReady DT ACS test suite, you’re ready to process the results using the “ACS Processing” option in the action menu.
If ACS passes all mandatory tests but fails some-or all of the non-mandatory tests, then the status will default to “conditional pass.” The user may then choose to “Self-comply” and publish the results as a pass.
If the ACS tests pass all mandatory and non-mandatory tests, it’s Complinace Run status will automatically default to “pass.”
The video below provides a tutorial on processing ACS results in ONELab:
Understanding the ACS Results Processing Page
The ACS Results Processing page, shown below, provides several features to aid the user in understanding the test results.
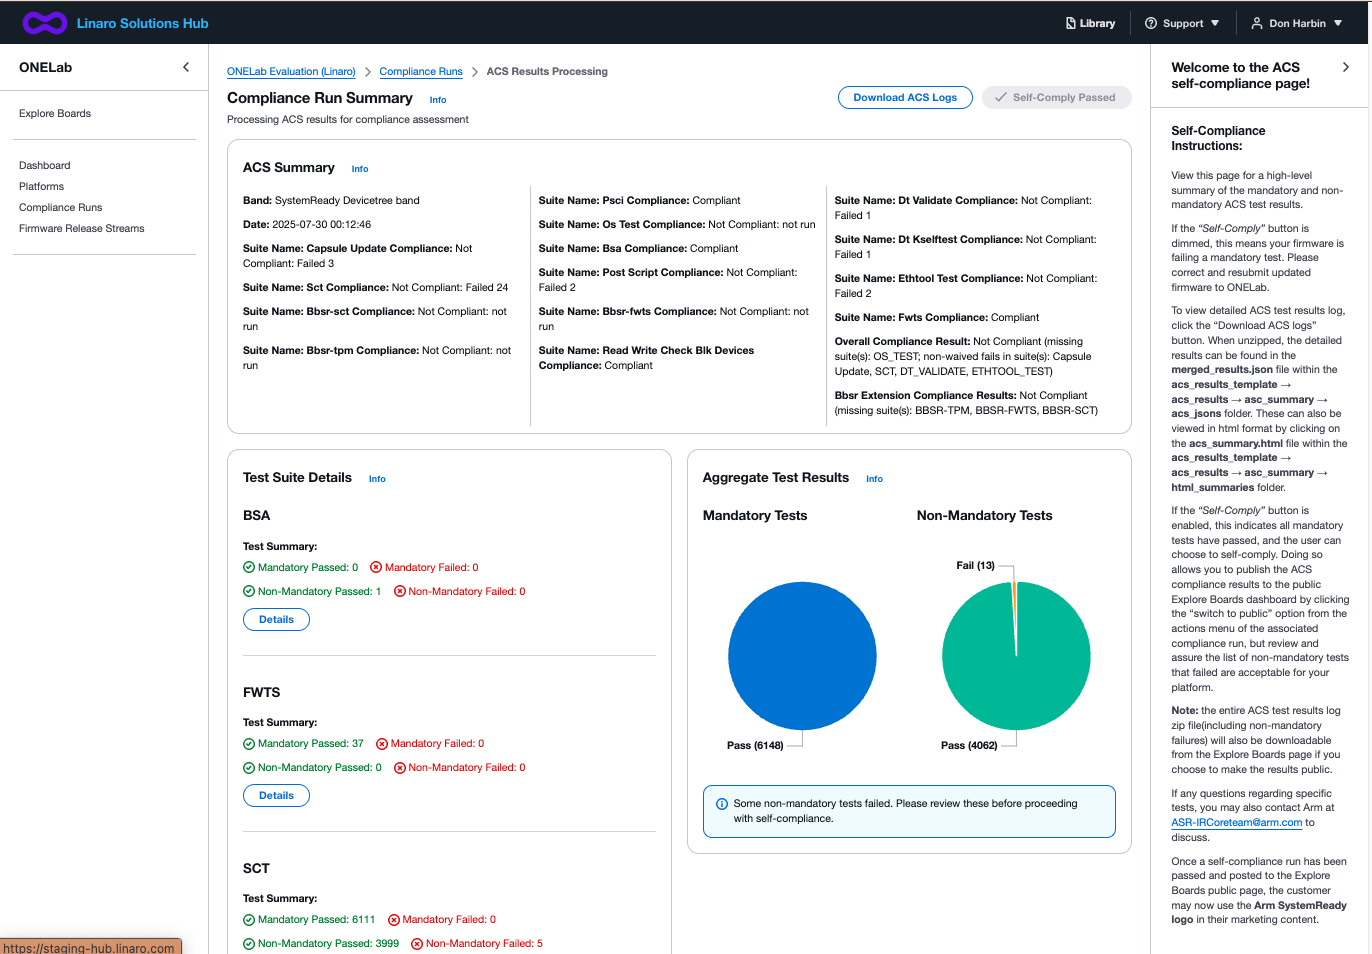
The Self-Compliance Instructions side panel is important to review and understand prior to minimizing. Of particular note are the following:
Email address to contact the Arm ACS team with results questions
How to Self-Comply your Firmware Release Stream
The details logs that are shared in the public Explore Boards page
Permissions to use the Arm SystemReady Logo.
Note
Once a firmware in ONELab passes the SystemReady tests and that run is switched to public, the ONELab participant has permission to use the SystemReady Logo for marketing purposes in association with the DUT that passed. An electronic copy of the SystemReady Logo can be found here
It is also requested that the platform provider fill out and submit the Arm SystemReady Compliance Declaration Form.
Test Results Status Descriptions
When reading the ACS Results logs, you will notice there are several levels results can be in. The following lists those with a description:
When reading the High Level Summary in the ONELab ACS Results Processing page, the following represents the type of test:
Mandatory: In the Arm ACS Results log, these are identified as Waiverable: No in Arm ACS documentation. They must be passed in order for the “Self-Certify” button to be enabled.
Non-Mandatory: In the Arm ACS Results log, these are identified as Waiverable: Yes. It is up the Platform Provider to decide if you want to “Self-Comply.”
If any non-mandatory/waiverable failures are found when all Mandatory/Non-waiverable tests pass, then the user has the option to Self-Comply and the self-comply button will be enabled.
When Reading the downloadable ACS results log, there are multiple possible results. The list below defines these:
Passed: Straight forward, the test ran and had the expected outcome.
Failed: The test ran correctly, but the result was unexpected.
Failed with Waiver: The tests ran correctly, but the result was unexpected. But the test is considered not mandatory for compliance and so the failure can be waived with a valid reason.
Aborted: The test began running but was terminated early due to an error.
Example: In the FWTS -> ESRT tests, test 2 checks the validity of fw_class value in the table. But if your platform doesn’t implement an ESRT this test might crash when it tries to fetch the table causing an Abort. Aborts can be seen essentially as failures.
Skipped: Essentially means the test was not run as the feature isn’t supported on the platform and is not required for compliance.
Example: In FWTS the Runtime Variable tests may be skipped and not run if your platform doesn’t support SetVariable Services at runtime. (Runtime SetVariable Support not required for SystemReady compliance as stated in the EBBR).
Warnings: Essentially just informative details for the user outputted by the suites, usually for when the tools spot something that isn’t ideal, but doesn’t affect compliance.
Ignored: Known issues with the various tools, particularly with the SCT, that are automatically parsed out. This is usually a known failure or due to a bug or an unnecessary test that can be safely ignored.
Using the ONELab Search Feature
ONELab provides a searchbar on on both the Explore Boards page, the Compliance Runs page. It can search on multiple properties in order for the user to narrow down the items displayed. You can search based on pre-defined fields or just type in a string to look for matching fields. When typing in the random string, the search isn’t case sensitive. When you select the items found, it will display them in the results space when clicked. Use the “Clear Filters” selection to return the Dashboard to show all Compliance Runs that your login provides you access to.
The short video below provides an example.
ONELab Accessing the Dashboard
When you initially log into ONELab through the Linaro Hub and navigate to your ONELab subscription, you will land on your private ONELab Dashboard. This is an overview page that provides a high level view of Compliance Runs, Firmware Release Streams, and Platforms associated with the account. It also provides a link to the public Explore Boards page. From this Dashboard, the user can perform all tasks associated with ONELab, including uploading firmware(Firmware Release Streams), kicking off Compliance runs, evaluating results, and publishing results.
Note
Note that nearly all entries and pages have additional information icons (either in info or and i* button) to provide additional information on each component.
To gain more details and control of each item summarized on the Dashboard, the user can either click the item in the sidebar or click directly in the pane.
ONELab Reviewing and Configuring a Platform
Additional details for each Platform can be viewed by navigating to the Platforms page, and then clicking on the name of the platform of interest. From there, if you wish to change the name, owner, location, customer contact, or Device Type of the Platform, click the Actions –> Configure option.
Warning
WARNING: Damage can occur to either the DUT or the LAA if the Platform is not configured for the DUT that is mounted on the LAA.
ONELab Scheduling a Compliance Run
Creation of a Release Stream
A compliance run requires that a Release Stream has been created. To do this, follow these steps.
Note
Typically, when you schedule a compliance run, you will re-use an existing Release Stream. It is only necessary to add new Release Streams when adding a new platform or updating to a new version of firmware. Otherwise, you will likely add a minor firmware revision to an existing Firmware Release Stream.
Schedule Compliance Runs
To Schedule a Compliance Run, click the Compliance Run button from either the ONELab Dashboard or the Compliance Run pages.
There are a couple other ways to start a new Compliance Run:
You can also choose to kick off a compliance run after uploading a new Firmware Release Stream.
If you wish to rerun a Compliance Run, from the Compliance Run page you can click on the Actions hamburger submenu and then click Rerun
Managing ONELab CI Test Results
After you have started to run Compliance Runs, there are several ways to review and manage the results. This section provides an overview of these.
Reading the Compliance Runs Page
The Compliance Runs page provides you with most all pertinent information for each run including the Compliance Suite run, the user that initiated the run, the platform the test was run on, date, and run ID.
Additional information can be found in the Actions Hamburger submenu such as downloading the LAVA test log.
For SystemReady DT tests, the Actions submenu will also provide a link to the ACS Processing page wherein the user may Self-Comply or further analyze ACS issues. For more information on how to process SystemReady DT ACS results, please see the SystemReady ACS Results Processing section for more info.
Note
To learn more about SystemReady DT and ACS testing, please see this section that points to Arm assets.
Deleting Compliance Runs
After a Compliance Run is initiated, there are windows wherein the run may be cancelled. To do so, once again click the Actions hamburger for the run and select Delete. Note there may be windows wherein a run will not be allowed to be deleted such as when a test is running to prevent the user from “bricking” a DUT.
Downloading Logs
From the Actions hamburger menu, click Download LAVA job log to review the LAVA log for the associated Compliance Run.
Publishing Results
If a Compliance Run has Passed, then the user will have the option to publish that run to the public Explore Boards page by selecting the Switch to Public option in the Actions hamburger submenu. The Visibility column on the Compliance Runs page shows if a run has been made public. The action can also be reverted, taking the Compliance Run back to Private (only visible in you private Dashboard).