ONELab Firmware Packaging & Upload
There are two scenarios wherein a user can upload firmware for compliance testing in ONELab. The first is the creation of a new Firmware Release Stream, and the second is when a user wants to append a new firmware version to an existing Release Stream. Packaging the firmware for upload uses the same process for both as defined in the remainder of this section.
Firmware Upload Requirements
To meet SystemReady DT compliance, firmware must conform to the UEFI specification. Therefore, Device/Product Manufacturers using ONELab must ensure their firmware is UEFI-compliant to pass the SystemReady DT ACS tests.
Linaro ONELab requires firmware to be built and packaged as described in this section. Additionally, for a user to eventually support firmware updates via LVFS, the firmware must be packaged in an LVFS-compatible format.
This section outlines the required packaging format for submitting firmware to ONELab for SystemReady DT validation and testing.
Rationale and Overview
The primary input to ONELab is the customer’s UEFI firmware to be validated for SystemReady DT compliance. Equally important, ONELab aims to validate firmware packaged for use with LVFS and the fwupd utility.
This section provides an overview of LVFS and outlines the key compatibility requirements for uploading firmware to ONELab. Subsequent sections will detail how to create firmware images compatible with both ONELab and LVFS.
LVFS is a widely used free service that supports hardware vendors with the ability to perform secure firmware updates. For hardware vendors, LVFS compatibility is essential, as it streamlines secure firmware deployment across various Linux distributions and supports compliance with standards like SystemReady DT ensuring systems remain interoperable, up-to-date, and secure.
To ensure that ONELab is validating firmware that is compatible with LVFS, ONELab requires firmware submitted for testing to be provided in the LVFS-compatible .cab format. Both LVFS required and optional content must be included when building the .cab file to meet ONELab’s requirements to validate against SystemReady DT test suites.
After reading this section, you will be able to successfully package your firmware in UEFI capsules that support SystemReady DT 3.x requirements. This will also include providing firmware updates to existing ONELab Release Streams for verification.
Building the ONELab Firmware File for Upload
Note
All examples in this document assume a Linux development environment, specifically a Debian-based Linux distribution that uses the APT package manager.
General Flow
Your firmware is of course the primary input to ONELab for SystemReady DT validation. It must be built and packaged according to the following requirements.
The submission must include metadata that clearly identifies the firmware, its target platform or DUT (Device Under Test), and other fields necessary for unique identification.
Firmware must currently be packaged as a single .cap file (UEFI Capsule Update) containing all required components (e.g., OP-TEE, TF-A, U-Boot) for the full firmware stack. This file must be wrapped in an LVFS-compatible .cab with metadata for ONELab testing.
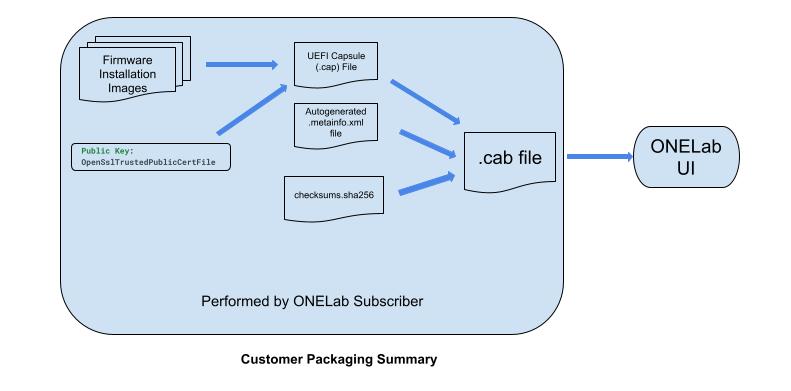
As shown above, the customer will be required to provide one input into ONELab, the .cab file.
The following subsections provide guidance on how to build a ONELab compliant .cab file for SystemReady DT validation in ONELab.
Prerequisites
Note
Examples in this section assume Ubuntu 24.04. If using a different environment, detailed instructions will differ.
The examples provided are intended to help users successfully set up and build a valid cabinet (.cab) file. Once you’ve confirmed the process using these examples, you can apply the same steps to your actual firmware and its supporting metadata.
Warning
It was found that Ubuntu 22.04 did not support updating a required package to the latest version. It was required to upgrade to Ubuntu 24.04 to get the fwupd to version 1.9.x or higher.
$ fwupdtool --version
Loading…                 [************************************** ]
compile   org.freedesktop.fwupd         1.9.24
compile   com.hughsie.libxmlb           0.3.18
compile   com.hughsie.libjcat           0.2.0
runtime   org.freedesktop.fwupd-efi     1.4
compile   org.freedesktop.gusb          0.4.8
runtime   com.hughsie.libxmlb           0.3.x
runtime   com.hughsie.libjcat           0.2.0
runtime   org.freedesktop.gusb          0.4.8
runtime   org.freedesktop.fwupd         1.9.24
runtime   org.kernel                    6.8.0-45-generic
Examples in this section assume a python3 environment.
Running the following in your dev environment should catch most of the dependencies for your setup.
sudo apt -y install build-essential uuid-dev iasl git nasm
sudo apt -y install cabextract
sudo apt -y install  gcab
sudo apt -y install p7zip-full p7zip-rar
sudo apt -y install fwupdate
sudo apt -y install uuid-runtime
A summary of the prerequisites is in the video below:
UEFI Capsule Update .cap File Format and Creation
Capsule Creation
The recommended tool to create signed capsules is GenerateCapsule, provided by EDK2. While it supports command-line arguments for specifying input parameters—such as signing keys, GUIDs, and other options—it also supports input though a .json configuration file for clarity and maintainability. This is what will be used in this walk though.
The .json below shows the format. The fields must be customized with the values needed to support your bootloader. The complete list of descriptors that can be used are in the EDK2 GenerateCapule.py script.
The json below represents the required format by the script which aligns to the EFI_FIRMWARE_IMAGE_DESCRIPTOR definition in §23.1.2 of the UEFI Specification.
sample.json
{
      "Payloads": [
      {
              "FwVersion": "1",
              "Guid": "GUID-0",
              "HardwareInstance": "0",
              "LowestSupportedVersion": "x",
              "MonotonicCount": "0",
              "Payload": "/path/to/Payload-0",
              "UpdateImageIndex": "1",
              "OpenSslSignerPrivateCertFile": "CRT.pem",
              "OpenSslTrustedPublicCertFile": "CRT.pub.pem",
              "OpenSslOtherPublicCertFile":   "CRT.pub.pem"
      },
     {
              "FwVersion": "2.2",
              "Guid": "GUID-N",
              "HardwareInstance": "0",
              "LowestSupportedVersion": "x",
              "MonotonicCount": "0",
              "Payload": "/path/to/Payload-N",
              "UpdateImageIndex": "2",
              "OpenSslSignerPrivateCertFile": "CRT.pem",
              "OpenSslTrustedPublicCertFile": "CRT.pub.pem",
              "OpenSslOtherPublicCertFile":   "CRT.pub.pem"
     }
   ]
}
Important notes in regards to the .json file above:
The example shows two payloads(images). Using multiple images enables partial firmware updates (e.g. update just TF-A), though vendors may choose to use a single image.
In multi-image firmware builds, each image requires a unique ImageTypeId GUID. This GUID must remain unchanged to maintain capsule update compatibility.
Firmware components like OP-TEE, TF-A, and FIP may be packaged as a single image or as separate images. In a single image, all components are updated together. With multiple images, vendors can update individual components—such as TF-A—independently.
Production GUIDs are permanently assigned by the originating project (e.g., U-Boot or EDK2). These GUIDs are already embedded in the user’s UEFI firmware and can be used along with their corresponding images throughout this example.
Note
All GUIDs must be created in compliance with this chapter of the UEFI Specification. Customers must generate these GUIDs before completing the JSON configuration file. i
A capsule may include an image not present on the DUT; in such cases, the image will be skipped. Similarly, if the image version in the .cap file matches the one already installed, it will also be skipped.
The flowchart below illustrates how ONELab processes the capsule file upon receipt.
        graph TD
 A[Input .cab File] --> C[Perform Checksum on Files]
 C --> D{For Each Payload Image in the .cap}
 D --> E["Compare Image GUID (UpdateImageTypeId) with Installed Image GUID"]
 E --> F{Does GUID Match AND a newer version}
 F -- Yes --> H[Update Installed Image]
 F -- No --> G[Skip Update]
To go through the included example, you’ll need to create a temporary GUID, temporary keys, and update the .json file as shown in the 3 examples.
Test GUID Creation
Create temporary GUIDs as shown below.
$ uuidgen
4d46c940-ebc7-4b18-a78a-8af35a52659f
Run the above command multiple times to generate as many properly formatted GUIDs as needed. When executing the GenerateCapsule script with a customized sample.json, the tool checks that all GUIDs are correctly formatted.
If GUIDs are already assigned to the images that will be part of the capsule, use those.
Whether using temporary test GUIDs or actual production ones, the GUIDs you plan to use should be avaiblable to add to the .json
Test Key Creation
When building the capsule, you must include both the private certificate (OpenSslSignerPrivateCertFile) and the public certificate (OpenSslTrustedPublicCertFile) used to sign and authenticate the capsule during installation. For ONELab, the OpenSslTrustedPublicCertFile is also required when uploading a new Release Stream.
You may use production keys or generate a dedicated test key pair for validation on ONELab.
Note
Note that the UEFI firmware includes the public key used for capsule verification. This key must match the public key provided during the upload process. ONELab uses it to validate the capsule before accepting the cabinet file. If the keys do not match, the upload will produce an error.
During actual testing, the same public key embedded in the firmware is used by the platform to verify the capsule on-device.
To create test keys, a script(create_pems.py) has been made available here In this example, if the script is run from the working directory, it will place the keys in a subfolder that is already pointed to by the sample.json (./onelab_keys).
Note
Note that when running the create_pems.py script, it will request a password several times. Simply press “enter” each time and don’t enter a password
$ cd ~/dev/onelab
~/dev/onelab$ create_pems.py   // creates needed keys and puts them in ./onelab_keys
You should now have the keys and GUIDs available to use to populate the .json
Populate .json
Now that the GUID(S) and Keys are available, you can create the sample.json required for building the capsule file.
A sample.json file is available in the scripts directory for reference. It can be customized for building your specific capsule file.
Starting with the sample.json, fill in the GUID and Keys created in the previous two steps. Also fill in the other requested information such as the path to the payload image and the Image Version.
This example assumes we’re using the sample.json found in the script directory and shown below.
{
      "Payloads": [
      {
           "FwVersion": "1",
           "Guid": "a38238e4-6737-48e2-ad1a-dd81864bbd69",
           "HardwareInstance": "1",
           "LowestSupportedVersion": "1",
           "MonotonicCount": "0",
           "Payload": "$HOME/dev/onelab/sample_bin/ImageA.bin",
           "UpdateImageIndex": "1",
           "OpenSslSignerPrivateCertFile": "./onelab_keys/CRT.pem",
           "OpenSslTrustedPublicCertFile": "./onelab_keys/CRT.pub.pem",
           "OpenSslOtherPublicCertFile":   "./onelab_keys/CRT.pub.pem"
      },
     {
           "FwVersion": "2",
           "Guid": "22f34803-98c6-4ee6-a912-bd7edb7ee897",
           "HardwareInstance": "0",
           "LowestSupportedVersion": "2",
           "MonotonicCount": "0",
           "Payload": "$HOME/dev/onelab/sample_bin/ImageB.bin",
           "UpdateImageIndex": "2",
           "OpenSslSignerPrivateCertFile": "./onelab_keys/CRT.pem",
           "OpenSslTrustedPublicCertFile": "./onelab_keys/CRT.pub.pem",
           "OpenSslOtherPublicCertFile":   "./onelab_keys/CRT.pub.pem"
     }
   ]
}
Note
The sample.json file assumes that the UEFI firmware images (ImageA.bin and ImageB.bin) are located in the ./sample_bin subdirectory. The contents of these .bin files are not relevant for this example, as they are not intended to be executed. In a production setup, ONELab users should replace them with a valid fileset that produces a UEFI SystemReady DT firmware for test.
With the sample.json built, you’re now ready to build the capsule!
Building the Capsule Update File (.cap)
The following builds the capsule defined in sample.json and names it ONELab_sample.capsule.
$ cd ~/dev/onelab
~/dev/onelab$ git clone --depth 1 https://github.com/tianocore/edk2.git
~/dev/onelab$ ./edk2/BaseTools/BinWrappers/PosixLike/GenerateCapsule -j sample.json -e -o ONELab_sample.capsule
Note
U-Boot also provides ‘mkeficapsule’ but at the moment of writing they are not compatible. Since we need the edk2 tool to extract firmware from the capsules as well, users are advised to use the EDK2 tools for now.
.Cab File Format and Creation Instructions
With the UEFI Capsule(s) built per the previous section, the user can now build the Cabinet file.
Building the .cab archive for ONELab
Warning
It was found that Ubuntu 22.04 did not support updating a required package to the latest version. It was required to upgrade to Ubuntu 24.04 to get the fwupd to version 1.9.x or higher.
ONELab recommends using fwupd. It works seamlessly with LVFS and provides tools to package and distribute firmware images. Those tools already define a set of metadata that ONELab can reuse. More information on the supported metadata can be found here. The tool will create an .xml file and inject it to the .cab archive. Additional information on firmware_packager.py can be found here.
Below is an example of building the .cab file using firmware_packager.py highlighting the parameters required by ONELab.
firmware_packager.py \
     --firmware-name <ONELab Device Type> \
     --release-version 0.x \
     --release-description <Details about the firmware version>
     --bin <board name>.capsule \
     --out <name>_capsule.cab \
     --device-guid <device specific GUID> \
     --developer-name <company name> \
     --firmware-summary <ONELab Release Stream> \
     --firmware-description <optional description> \
     --version-format number|double|triplet|quad etc \
     --update-protocol org.uefi.capsule
Several of the parameters are required by fwupd. Others are optional, and are thus leveraged by ONELab to provide required inputs. A description of the arguments and their ONELab usage is below:
firmware-name:
Overloaded Field - Contains a valid/registered ONELab Device Type. Required by fwupd.org and by ONELab
release-version:
Represents the release version found in the LVFS metainfo.xml file(referenced above). ONELab will use this release-version as the firmware version reference in the ONELab Dashboard. Required
release-description:
A Release Stream can contain multiple firmware versions. This field provides a text description with any additional details specific to the firmware version being uploaded to the Release Stream. Optional
bin:
path to the capsule file generated in Building the Capsule Update File (.cap) section above Required
out:
output file name of the .cab archive Required
device-guid:
GUID of the device this firmware will run on, this must match the output of one of the GUIDs in
fwupdmgr get-devices. If a capsule has been created with multiple images, note that each image has its own GUID. This field shall represent the GUID on the first entry of these, and any remaining ones will automatically be resolved by fwupdmgr for the purposes of capsule update. Requireddeveloper-name:
Company name. Required
firmware-summary:
This must include the targeted ONELab Release Stream Name. If unique, a new Release Stream will be created in ONELab, if pre-existing, the release-version will be added as a next increment to the existing Release-Stream. Required by ONELab
firmware-description:
This is a longer description string of the image. It will be displayed in the appropriate ONELab Dashboards. Optional by ONELab, however it must remain the same for a ONELab Release Stream.
version-format:
number e.g 1,2,3 etc or double 0.1, 0.2 etc or triple 0.1.1, 0.1.2 etc
update-protocol:
must be set to org.uefi.capsule. Required
Continuing with the example we’ve been building upon up to this point, we’re ready to wrap the ONELab_sample.capsule file we build earlier into a .cab by using the firmware_packager.py script
~/dev/onelab$ git clone https://github.com/fwupd/fwupd.git
~/dev/onelab$ ./fwupd/contrib/firmware_packager/firmware_packager.py \
--firmware-name VALID_DEVICE_TYPE \
--device-guid a38238e4-6737-48e2-ad1a-dd81864bbd69 \
--developer-name Linaro \
--release-version 0.4.1 \
--version-format triplet \
--bin $HOME/dev/onelab/ONELab_sample.capsule \
--out ONELab-sampleV1.cab \
--update-protocol org.uefi.capsule \
--firmware-summary "Dons_test_Release_Stream"  \
--firmware-description "Optional expanded description of this firmware build" \
--release-description "Optional additional description"

Using temp directory /tmp/tmpk7etu1s4
Locating firmware bin
Creating metainfo
Creating cabinet file
Done

~/dev/onelab$
At this point, you should now have a ONELab compatible .cab file as well as better understanding to process and reasons for creating this in ONELab.
You are now prepared to being testing your firmware on ONELab by creating a Release Stream and kicking off a Compliance Run. The instructions to do this can be found in the ONELab User Interface section of this document.
Additional Tooling (optional)
This section provides some additional tools that a ONELab user may find helpful when building .cap and .cab files for ONELab. These allow the user to check what has been built.
Customizing an existing .cab from the CLI
In some cases, you may be interest in customizing your .cab file but you don’t need to update the binary image in the cab. This section provides a way to do this from a Linux (or mac) command line.
Instructions:
Locate the .cab file you want to modify. This may be done by downloading one from and existing Release Stream or could just be one you have locally. Place the .cab into it’s own working directory on you dev machine.
From command line, execute the following commands
cabextract <name>.cabthis will create two files in your directory,firmware.binandfirmware.metainfo.xmlUsing a text editor, edit the xml, change the fields as you wish. Recall that the meta fields are overloaded for ONELab, the mapping of these fields is located in this section of the ONELab Users Guide.
For example: the <name> field in the xml maps to the Device Type, and the <summary> field maps to the Release Stream name.
save the xml
Run
gcab -c -n firmware.cab firmware.metainfo.xml firmware.binto generate your new .cab. You can of course change the output file name (firmware.cab) to whatever you want, but it really has no impact.You are now ready to go to ONELab and “Add New Release Stream” with your newly modified cab
Reverse a .cab archive for ONELab
Extract files from the .cab archive
$~> cabextract test.cab
Extracting cabinet: test.cab
extracting firmware.bin
extracting firmware.metainfo.xml
All done, no errors.
Reverse the .cap file for ONELab
Dump capsule information
$~ >./BaseTools/BinWrappers/PosixLike/GenerateCapsule firmware.bin --dump-info

========
EFI_CAPSULE_HEADER.CapsuleGuid      = 6DCBD5ED-E82D-4C44-BDA1-7194199AD92A
EFI_CAPSULE_HEADER.HeaderSize       = 00000020
EFI_CAPSULE_HEADER.Flags            = 00000000
 OEM Flags                         = 0000
EFI_CAPSULE_HEADER.CapsuleImageSize = 00289E5D
sizeof (Payload)                    = 00289E3D
--------
EFI_FIRMWARE_MANAGEMENT_CAPSULE_HEADER.Version             = 00000001
EFI_FIRMWARE_MANAGEMENT_CAPSULE_HEADER.EmbeddedDriverCount = 00000000
EFI_FIRMWARE_MANAGEMENT_CAPSULE_HEADER.PayloadItemCount    = 00000002
EFI_FIRMWARE_MANAGEMENT_CAPSULE_HEADER.ItemOffsetList      =
 0000000000000018
 0000000000030F8B
EFI_FIRMWARE_MANAGEMENT_CAPSULE_IMAGE_HEADER.Version                = 00000003
EFI_FIRMWARE_MANAGEMENT_CAPSULE_IMAGE_HEADER.UpdateImageTypeId      = 02F4D760-CFD5-43BD-8E2D-A42ACB33C660
EFI_FIRMWARE_MANAGEMENT_CAPSULE_IMAGE_HEADER.UpdateImageIndex       = 00000001
EFI_FIRMWARE_MANAGEMENT_CAPSULE_IMAGE_HEADER.UpdateImageSize        = 00030F43
EFI_FIRMWARE_MANAGEMENT_CAPSULE_IMAGE_HEADER.UpdateVendorCodeSize   = 00000000
EFI_FIRMWARE_MANAGEMENT_CAPSULE_IMAGE_HEADER.UpdateHardwareInstance = 0000000000000000
EFI_FIRMWARE_MANAGEMENT_CAPSULE_IMAGE_HEADER.ImageCapsuleSupport    = 0000000000000001
sizeof (Payload)                                                    = 00030F43
sizeof (VendorCodeBytes)                                            = 00000000
EFI_FIRMWARE_MANAGEMENT_CAPSULE_IMAGE_HEADER.Version                = 00000003
EFI_FIRMWARE_MANAGEMENT_CAPSULE_IMAGE_HEADER.UpdateImageTypeId      = 4CE292DA-1DD8-428D-A1C2-77743EF8B96E
EFI_FIRMWARE_MANAGEMENT_CAPSULE_IMAGE_HEADER.UpdateImageIndex       = 00000002
EFI_FIRMWARE_MANAGEMENT_CAPSULE_IMAGE_HEADER.UpdateImageSize        = 00258E82
EFI_FIRMWARE_MANAGEMENT_CAPSULE_IMAGE_HEADER.UpdateVendorCodeSize   = 00000000
EFI_FIRMWARE_MANAGEMENT_CAPSULE_IMAGE_HEADER.UpdateHardwareInstance = 0000000000000000
EFI_FIRMWARE_MANAGEMENT_CAPSULE_IMAGE_HEADER.ImageCapsuleSupport    = 0000000000000001
sizeof (Payload)                                                    = 00258E82
sizeof (VendorCodeBytes)                                            = 00000000
--------
EFI_FIRMWARE_IMAGE_AUTHENTICATION.MonotonicCount                = 0000000000000000
EFI_FIRMWARE_IMAGE_AUTHENTICATION.AuthInfo.Hdr.dwLength         = 00000892
EFI_FIRMWARE_IMAGE_AUTHENTICATION.AuthInfo.Hdr.wRevision        = 0200
EFI_FIRMWARE_IMAGE_AUTHENTICATION.AuthInfo.Hdr.wCertificateType = 0EF1
EFI_FIRMWARE_IMAGE_AUTHENTICATION.AuthInfo.CertType             = 4AAFD29D-68DF-49EE-8AA9-347D375665A7
sizeof (EFI_FIRMWARE_IMAGE_AUTHENTICATION.AuthInfo.CertData)    = 0000087A
sizeof (Payload)                                                = 000306A9
--------
No EFI_FIRMWARE_IMAGE_DEP
--------
FMP_PAYLOAD_HEADER.Signature              = 3153534D (MSS1)
FMP_PAYLOAD_HEADER.HeaderSize             = 00000010
FMP_PAYLOAD_HEADER.FwVersion              = 00000001
FMP_PAYLOAD_HEADER.LowestSupportedVersion = 00000001
sizeof (Payload)                          = 00030699
========
--------
EFI_FIRMWARE_IMAGE_AUTHENTICATION.MonotonicCount                = 0000000000000000
EFI_FIRMWARE_IMAGE_AUTHENTICATION.AuthInfo.Hdr.dwLength         = 00000892
EFI_FIRMWARE_IMAGE_AUTHENTICATION.AuthInfo.Hdr.wRevision        = 0200
EFI_FIRMWARE_IMAGE_AUTHENTICATION.AuthInfo.Hdr.wCertificateType = 0EF1
EFI_FIRMWARE_IMAGE_AUTHENTICATION.AuthInfo.CertType             = 4AAFD29D-68DF-49EE-8AA9-347D375665A7
sizeof (EFI_FIRMWARE_IMAGE_AUTHENTICATION.AuthInfo.CertData)    = 0000087A
sizeof (Payload)                                                = 002585E8
--------
No EFI_FIRMWARE_IMAGE_DEP
--------
FMP_PAYLOAD_HEADER.Signature              = 3153534D (MSS1)
FMP_PAYLOAD_HEADER.HeaderSize             = 00000010
FMP_PAYLOAD_HEADER.FwVersion              = 00000001
FMP_PAYLOAD_HEADER.LowestSupportedVersion = 00000001
sizeof (Payload)                          = 002585D8
========
Extract capsule images
$~ >./BaseTools/BinWrappers/PosixLike/GenerateCapsule -d test.capsule -o test

GenerateCapsule: decode warning: can not verify singed payload without cert or pfx file. Index = 1
Error loading file None
80C6972E6D7F0000:error:80000002:system library:file_ctrl:No such file or directory:../crypto/bio/bss_file.c:297:calling fopen(None, r)
80C6972E6D7F0000:error:10080002:BIO routines:file_ctrl:system lib:../crypto/bio/bss_file.c:300:
80C6972E6D7F0000:error:05880020:x509 certificate routines:X509_load_cert_file_ex:BIO lib:../crypto/x509/by_file.c:97:

GenerateCapsule: warning: payload verification failed Index = 1
GenerateCapsule: error: openssl failed.
GenerateCapsule: decode warning: can not verify singed payload without cert or pfx file. Index = 2
Error loading file None
80B6A034B17F0000:error:80000002:system library:file_ctrl:No such file or directory:../crypto/bio/bss_file.c:297:calling fopen(None, r)
80B6A034B17F0000:error:10080002:BIO routines:file_ctrl:system lib:../crypto/bio/bss_file.c:300:
80B6A034B17F0000:error:05880020:x509 certificate routines:X509_load_cert_file_ex:BIO lib:../crypto/x509/by_file.c:97:

GenerateCapsule: warning: payload verification failed Index = 2
GenerateCapsule: error: openssl failed.
Since the capsule must be signed and the files won’t have the private certificate (at the moment of writing the EDK2 tools need both the private and public key pair to authenticate a capsule, although the private part is not needed), some SSL errors will appear. You can safely ignore these. You can also run the tool with -v (verbose) for a more verbose output.
The capsule we extracted has 2 payloads (as seen in the example above). After the command you should find 2 files in the folder test.Payload1.bin and test.Payload2.bin
You’ve now created and validated a sample UEFI Capsule wrapped in a ONELab compatible Cabinet file.
You are now prepared to being testing your firmware on ONELab by creating a Release Stream and kicking off a Compliance Run. The instructions to do this can be found in the ONELab User Interface section of this document.
Using ONELab Cabinet Builder
While the previous sections are helpful to understand the individual steps to build you ONELab cabinet file, there may be users that would prefer to simply use a prebuilt virtual environment. ONELab team created a Docker image with all aforementioned dependencies pre-installed along with a single command in that environment to create you .cab.
This section describes how to do so. Before diving into the Docker command below, there are a few required files that need to exist:
payloads.json: This follows the exact same format as described above.
my-firmware.bin and my-firmware2.bin: These are simple testing files to show off creating cabinet for firmware including more than one payload.
CRT.pem and CRT.pub.pem: These are the certificate files.
Make sure all necessary files are within your current directory tree.
# Create cabinet file in a single command
$ docker \
      run \
      -v <current absolute directory path>:/workspace \
      -it artifacts.codelinaro.org/onelab-tools/cabinet-builder \
      create-firmware-package \
          --developer-name "Charles Oliveira" \
          --target-device MyDevice \
          --target-device-guid 11111111-2222-3333-4444-555555555555 \
          --firmware-name "My Firmware in a Cabinet" \
          --release-version "0.0.1" \
          --release-description "First release" \
          --payloads-json payloads.json
[INFO] Working on temp dir: /tmp/tmpt_tk02gx
[INFO] Identified 2 images in payloads.json: my-firmware.bin, my-firmware2.bin
[INFO] Running ['/tools/edk2/BaseTools/BinWrappers/PosixLike/GenerateCapsule', '-j', '/tmp/tmpt_tk02gx/payloads.json', '-e', '-o', '/tmp/tmpt_tk02gx/firmware.capsule', '--verbose']
[INFO] Running ['python3', '/tools/firmware_packager.py', '--developer-name', 'Charles Oliveira', '--firmware-name', 'MyDevice', '--firmware-summary', 'My Firmware in a Cabinet', '--release-version', '0.0.1', '--bin', '/tmp/tmpt_tk02gx/firmware.capsule', '--out', '/workspace/my-firmware-in-a-cabinet.0.0.1.cab', '--device-guid', '11111111-2222-3333-4444-555555555555', '--version-format', 'triplet', '--update-protocol', 'org.uefi.capsule', '--release-description', 'First release']
[INFO] Cabinet file generated: /workspace/my-firmware-in-a-cabinet.0.0.1.cab
The final result is my-firmware-in-a-cabinet.0.0.1.cab file which can be uploaded to ONELab.
Extra helper scripts
The same Docker image can generate GUIDs and certificate files.
# Generate a GUID
$ docker run artifacts.codelinaro.org/onelab-tools/cabinet-builder generate-guid
b9c8e0e8-b164-4ff7-8191-35a18eb63dfd

# Generate certificate files
$ docker run -v <current absolute directory path>:/workspace -it artifacts.codelinaro.org/onelab-tools/cabinet-builder generate-pems
Enter Export Password:
Verifying - Enter Export Password:
Enter Import Password:

Files generated:
CRT.pem     (private)
CRT.pub.pem (public)
Note that CRT.pem and CRT.pub.pem are generated as mentioned above, via the create_pems.py script.